


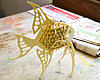
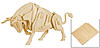
I'm planning on purchasing the files that create these.
For the purchase, I will get the EPS and the DXF file.
From what I'm seeing in the photo's, it doesn't look like their examples, were cut with a laser, since I don't see any burnt edges.
Do you folks think I can achieve these results seen in the pics, with a 1/16" bit in the CC ?
How else would they be cutting these?

 Reply With Quote


