
I have seen anti-static, wire wound, smooth inside, clear vacuum hose but I cannot seen to find it again. I am thinking of something like this:
http://www.desihose.com/viewproduct.aspx?pid=139


 Senior Member
I have seen anti-static, wire wound, smooth inside, clear vacuum hose but I cannot seen to find it again. I am thinking of something like this:
http://www.desihose.com/viewproduct.aspx?pid=139
 Junior Member
I like the idea, the issue is the small diameter hose makes choices much more limited for flexibility as well as strength with a balance of lightweight
Senior Member
I am not sure how far you can put out the bit before the machine gags. I have gone really far and milled almost 1.8 inches deep with a 3/16 end mill. It was 2 or 2.5 inches out and my chuck almost touches the board. It gives a good hard push on the bit plate. Since you can only go 1 inch into the board and the top of the shoe is like 1/2 inch above the board, a little over 1.5" should be good. I do not think it will be a problem. How far does the carving bit usually protrude below the chuck?Originally Posted by Sallen1215

I think that tip of the bit being 2.5 to 3 inches below the bottom of the truck is normal. Subtract the length of the Rock and what do you get?
Last edited by bergerud; 01-14-2013 at 08:10 PM. Reason: sp
 Senior Member
I didn't mean to imply that I could only get 1/16" accuracy; just that is all my project required. I usually do better. No, probably can'y eyeball to 1/100th inch.
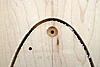
Here is the project that I just finished using jog to center. The two recesses at the far ends of the oval are to hold 1/2" dowels, and these will be secured with recessed screws from the back. 1/8" through holes were drilled from the back first, along with a recess for each hole for the screw head. On front, I drew a center line using the holes to determine the center width and measuring between the holes for center length. The 1/2" recesses were then drilled from the front, to align with the through holes from the back. I was actually spot on in the x direction and off just a bit in y, but of no consequence for this project.
frontback
front
front
I would like to know more about your technique for the cube for times when I need better accuracy. How exactly did you set that project up?
 Senior Member
I have the rock chuck with 1/2 adapter and just make it still playing around with it I have a few ideal of my own will post when again
Henry
Every one has a photographic memory. Some just don't have film.
Senior Member
With the sphere in the cube accuracy and consistency was extremely important. I is very difficult to fix the sphere if even one of the six carves is off. I made a jig into which a 2X2X2 inch cube snugly fits in from the top and is clamped from the front. The cube can be lifted out the top and flipped while the jig stays in the machine. It takes me awhile to set up the initial carve. Using scrap blocks, by trial and error, I find the coordinates corresponding to the center of the block face. After each test carve, I tweak the jog to coordinates from the keypad. (When it and asks to jog to center, I press numbers instead of the arrows.) Once I get a perfectly centered carve, I record the numbers. Now I put in the good wood and carve a pretty good sphere. I just keep using the same numbers. I actually will carve a few spheres once I have the numbers.
Once I remove the jig, turn off the machine, or abort the project, all is lost. It is possible, however, to carve different projects (ie. different face carves) with the same numbers. If for example, one wanted to make a set of alphabet blocks.
Senior Member
I need someone with a CarveTight chuck to test the shoe! The whole shoe idea was based on the 1/2 inch between the lowest point of the chuck and the board. This gap is unique to the CT. MT, you still do not have dust collection do you? Do you have a CT? Anybody??
Junior Member
I have a friends machine with me and i will remove his CT truck to check it, but i want to get my shoe mounted and working for the rock first. also i found a flexible hose i want to test and if it works i will have to figure out where you can get some as it is designed for the HVAC industry.
Member
I'd like to see how this works on the Rock
" The Hurdier I Go, The Behinder I Get"
Junior Member
So here is the fully installed unit on my machine minus the bit plate which i will install shortly, the weak point in this system is the pipe. but with this corragated hose it allows for the shoe to be built and we redesign the piece to no need the bearing or the pipe.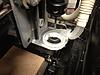
Last edited by Sallen1215; 01-15-2013 at 05:49 PM. Reason: sp
 Posting Permissions

 Reply With Quote