


A few weeks ago I received an email with a link to a Youtube video tutorial on a lever action Model 1874 rubber band rifle. HERE is the link to the video. There is also a free download for the plans in PDF format. I was thoroughly impressed and thought it would be a fun project. I built one using a band saw and scroll saw. I then figured; Hey! Why not use the CarveWright to carve out the pieces? It took quite a while using the Import Trace Image function to make the patterns from the plans.
I used the snapshot function in Adobe Reader to copy each PDF page to the clipboard and imported them into Paint.net to rotate the pages counter clock wise. I then copied and pasted the rotated page into designer as a trace image. When I imported the image into designer I made the board the same size as a piece of A4 paper (8.3W x 11.7H) to insure keeping the correct size of the parts. I then traced the parts on the board, selected all and created another board the correct size (A4) and thickness for the plywood I was using, then copy and pasted to the new board. I then set a cut path for each piece and drilled the correct size holes where needed.
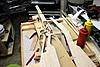
It did indeed turn out to be a very fun project. Even more so now that it is faster and way more accurate to cut the pieces on the CarveWright. It makes for a lot less sanding when the pieces fit better. It isn't finished yet. I will post a pic when it is finished.
This is going to make a perfect Christmas present for my great, great, grandson.

 Reply With Quote