This is a bit of a novelty for my nephew, who asked if I could make one. It was a bit of a design challenge for me, in that I had not done something quite like it, so of course I took it on.
Can you identify the origin/source of the Holy Hand Grenade without Google? Against what foe was it deployed? Where are the instructions for its use?
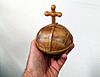
All the parts were designed using only Designer 3, except the scroll I designed quite a while back using Wolfie's Gradient Designer (before the 3D tools). Designer 3D tools were used quite a bit. The grenade is 4" in diameter, with top and bottom halves carved out of 2" thick stock using the 1/16" and 1/8" long ballnose bits. Grenade halves and stand arms are double-sided carves that must of course be precisely aligned. After a few years at this I've come up with a couple of techniques to do this accurately. The grenade is butternut if I recall correctly - I bought the wood at an estate sale a while ago. The cross and stand arms are oak, the base black walnut, and the scroll clear pine (using up some scraps). The halves are held together by small rare earth magnets, and can easily be separated by twisting the halves slightly to misalign the magnets.
My nephew wanted a hollow grenade - not sure what he's going to put in it. He said it was "work related" - that should be interesting! Shipping it off to him tomorrow.
Yes, Monty Python and the Holy Grail. Thanks! I have and will make plaques and signs, but I find it much more interesting to build things. When projects like this one are brought to me, I'll prioritize them over other less interesting things, even if those are paying projects (I am basically retired after all).
Currently resurrecting a couple of clock projects that I hope to make available.
One of my favorite movies of all time. Its from the book of armaments to kill the killer rabbit. I laughed so hard I woke everyone in the house first time I saw it.
The question still remains, "What is the airspeed of an unladen swallow?"...European or African? (chuckling)...coconuts...lol
Wow, probably one of the neatest projects I've seen. Just thinking about how you designed it so everything fit makes my head ache. Really beautiful, thanks so much for sharing.
Rick H
I was asked to post the files. Here are some tips on building this.
There are several two-sided carves that must be precisely aligned. I will try to snap some photos and describe my process for these carves in another post.
I made the rear of the hand grenade bottom slightly larger than 3" to make a tight fit with the top. I sanded the top and bottom a bit to get this tight fit. You may want to set it back to 3" if you don't want to sand.
The halves are held together with small rare earth magnets. You may have to alter diameter and depth of the magnet recesses to fit your magnets. I bought 100 magnets on ebay. Send me a PM if you would like to buy a set of 8 from me. Make sure you put all north pole on one half and all south pole on the other!
I made the cross in two pieces. This allowed me to scribe a slot in each half with a Dremel, along the red line. Once the halves are glued together, the slot becomes a pilot hole for a 3/16" drill bit. I glued a small piece of 3/16" brass tubing into the cross, and enlarged the hole in the hand grenade top with a 3/16" drill. This provides a tight fit for the pin. I can provide tubing with the magnets.
I sanded the angle on the stand parts with a disc sander to get a precise fit. This can be a little tricky. I fastend the stand parts and scroll to the base with screws.
I align two-sided carvings using Jog To Position. I have found this to be the most accurate for me.
Mark the center of each side of the board using an adjustable square. Set the square against the same edge of the board to mark both front and rear sides. That way, if you're off a fraction of an inch, it won't matter, as both sides will be equally off. After the machine measures the board, select Jog To Position. When prompted Jog to project, select Center. Use a flashlight in the slot of the machine's cover to illuminate the board and cast a shadow of the bit into the board. (If the machine prompts Enter X Position:, press Stop.) Jog with the arrow keys in the X direction until the shadow falls exactly over the marked center line. Move the flashlight to the front of the cover and similarly jog in Y.


 Reply With Quote

