Page 1 of 2 12 LastLast
Results 1 to 10 of 20

Thread: Eagle sign WIP

Hybrid View

Previous Post Previous Post   Next Post Next Post
  1. #1
    Join Date
    Oct 2012
    Location
    Chilliwack BC
    Posts
    107

    Default Eagle sign WIP

    I had a repeat customer ask if I could carve a sign on an irregular shaped piece of wood.
    At first I thought no problem I will use a carrier board.
    They wanted a sign originally 36 x 36. on irregular wood.... ouch
    Well I thought why nor carve the wood to look irregular.
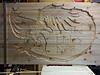
    They wanted an eagle carved on the end of a log.
    I used 5/4 cedar and glued up two 14 x 48 inch boards. I tool them to a local cabinet shop to sand them to 1 inch.
    I have tried glued up boards before and came upon a few issues. This time the only issue I had was the pattern I made for the machine was based on a 1.5 inch board The wood was now 1 inch and when I started to carve the machine asked me to input the wood thickness. I have never some across that before.

    So I needed a pattern for an irregular shaped log end. I got a picture from google and converted it to a pattern. Then I overlaid an eagle but by the time I made the pattern and enlarged it, it was too awkward to use.
    I ended up using two greyscale images and putting them together before importing into CW.
    Now all I have to do is enlarge them so they fit across 28 inches.
    Once I enlarged the pattern I put a little registration line through the center of the image. that way when I cut the trim on the boards I have a defined line to blend the boards.
    I cut the edges off the two boards and went back to the cabinet shop to touch up the line. Now it is glued and ready for cutting out on the band saw and scroll saws.
    I will finish it with Briwax and acrylic paints. More pictures to come.
    Oh I caved it on normal setting. 5 hours for each of the two boards. I should have put a new bit in the machine there were a few fuzzies that needed to be removed. I use a home made sanding mop and it came out pretty good.
    Click image for larger version. 

Name:	sign ready for cutout.jpg 
Views:	138 
Size:	78.3 KB 
ID:	77695

  2. #2
    Join Date
    Nov 2007
    Location
    Redmond, Or
    Posts
    360

    Default

    Carl,

    That is very impressive. I am sure your customer will be very pleased.

    Mike
    All Gave Some,
    Some Gave All.

    My computer configuration and software used:
    Gigabyte GA-990XA-UD3 Motherboard, AMD FX 6-core Processor Black Edition, 32 Gig DDR 3 Ram, Gigabyte HD 6450 Video Card with 1 Gig DDR 3 ram, Windows 10
    Designer 2.007, Designer 3.102, Pattern Editor, Centerline, Conforming Vectors, 2d Tools, 3d Tools, DXF Importer, STL Importer and Rotary Jig.

  3. #3
    Join Date
    Jan 2008
    Location
    As of 6/2021 Punta Gorda, Florida
    Posts
    1,461

    Default

    Excellent design Carl. Thank you for including the process you went through. Look forward to seeing it finished.

  4. #4

    Default

    Love it! I would even love to paint it! Please post when you are finished! Im sure your customer is going to appreciate it!

  5. #5
    Join Date
    Feb 2011
    Location
    New Jersey 07748
    Posts
    828

    Default

    OK that's sharp ....
    Mans Quest for knowledge,,, means he'll always find a way !!

  6. #6
    Join Date
    Oct 2012
    Location
    Chilliwack BC
    Posts
    107

    Default

    Thanks for all the kind comments.

    The finish is not complicated. It is really embarrassing when people ask me how long it takes to do it.
    I use a product called Briwax. the great thing is you don't need to let it dry between coats.
    First I apply the Teak colored wax to the feathers
    Click image for larger version. 

Name:	wax on.jpg 
Views:	53 
Size:	79.4 KB 
ID:	77750

    Then I buff it off leaving darker wax build up in the grooves.
    You can buff or sand the highlights to make them pop even more
    Click image for larger version. 

Name:	wax off.jpg 
Views:	47 
Size:	88.9 KB 
ID:	77749
    Next I waxed the background of the log with Light Brown Briwax. I painted the white letters and details. The bark edge is a ring of the Teak wax and then Ebony wax on the outer edge. The ebony can also be used to darken shadows around the body and legs of the eagle.

    I am still learning each time I carve, but I get less intimidated each time.

    Click image for larger version. 

Name:	wax back.jpg 
Views:	66 
Size:	63.8 KB 
ID:	77748

  7. #7
    Join Date
    Oct 2012
    Location
    Chilliwack BC
    Posts
    107

    Default

    getting there but some more to I still have to work on the tail
    goClick image for larger version. 

Name:	eag.jpg 
Views:	87 
Size:	93.7 KB 
ID:	77723

  8. #8

    Default

    Awesome!! I love it!

  9. #9
    Join Date
    Aug 2010
    Location
    Central NJ, In the Pinelands
    Posts
    120

    Default

    Really great looking sign, thanks for sharing the finishing techniques

  10. #10
    Join Date
    Dec 2010
    Location
    Coeur D'Alene Idaho
    Posts
    691

    Default

    Very impressive!

Page 1 of 2 12 LastLast

Tags for this Thread

Posting Permissions

  • You may not post new threads
  • You may not post replies
  • You may not post attachments
  • You may not edit your posts
  •