Results 1 to 9 of 9

Thread: Snowy Santa Carving

  1. Default Snowy Santa Carving

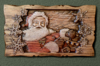
    I got a new pattern on the Pattern Depot that is only $10. http://store.carvewright.com/product...69&cat=&page=6

    I carved the pattern on a 7.25 inch wide, 12 inch long and .75 inch deep piece of red oak. I cut the edges of the carving with my Rockwell Bladerunner scrolling saw then used some Sabretooth Burr Bitts to shape the outer contours. Then I sanded using various sanding products and painted red, green and white using Real Milk Paints that I bought in trial sizes. I mix these paints using mineral spirits diluting them enough to be able to see through to the wood almost like a dye but these are mineral pigments. The colors are great for matching wood stain colors. I used the big plastic rotary brush to smash in the end grain to prevent it from darkening the ends. Then I sprayed on polyurethane so that it would dry fast without smudging the paints followed by a coat of brushed on polyurethane. Then I spray painted some dark brown spray paint for plastics and immediately rubbed off the excess using a rag with mineral spirits to give it an antique look. Doing this brought out a lot of detail of the carving.


    Click image for larger version. 

Name:	SAM_0337.JPG 
Views:	95 
Size:	1.78 MB 
ID:	73243Click image for larger version. 

Name:	MantelShot.png 
Views:	88 
Size:	1.01 MB 
ID:	73245Click image for larger version. 

Name:	SantaSnowScrnSht.png 
Views:	112 
Size:	1.53 MB 
ID:	73244


  2. Default

    Now that is COOL! Great work Alan.

  3. #3
    Join Date
    Jan 2008
    Location
    As of 6/2021 Punta Gorda, Florida
    Posts
    1,461

    Default

    I'll take one please..... What a great project. Love the way in which your painting technique made the project look like it has been around for years and years.

  4. #4
    Join Date
    Apr 2013
    Location
    Cornwall, Ontario, Canada
    Posts
    1,343

    Default

    Now that is very nice Alan, I love the paint job!

  5. #5
    Join Date
    Aug 2010
    Location
    Central NJ, In the Pinelands
    Posts
    120

    Default

    What a great looking piece, and thank you for sharing your finishing techniques!

  6. #6
    Join Date
    Aug 2008
    Location
    The Great Texas Gulf Coast
    Posts
    5,314

    Default

    Very nice, Alan. I like that a lot!
    CarveWright CX Packaged System - starting at $2000
    CarversClub 1 Year Subscription - $150.00/year
    Adv. Support w/out CC membership - $25.00/issue
    CarveWright Community Forum - PRICELESS!

  7. #7
    Join Date
    Jun 2007
    Location
    Cleveland Oh.
    Posts
    388

    Default

    Yeah, what Smurfjeep said, beautiful job.Gary
    3D Pro Ver. 3.103 Build 14, STL & DXF Importer, Rotary, Conforming Vectors, Centerline- Intel(R) Core(TM) 2 Duo CPU T6500 @ 2.10GHz 4GB Ram 64 bit Operating System using Windows 7

  8. #8
    Join Date
    Oct 2010
    Location
    Cornwall Ontario
    Posts
    898

    Default

    Alan Very nice .That is one anybody would love for the Holidays.

  9. Default

    Quote Originally Posted by SharonB View Post
    I'll take one please..... What a great project. Love the way in which your painting technique made the project look like it has been around for years and years.
    It does look old. I was reading the can of dark brown plastic paint before I bought it and it said that you can wipe off the excess using mineral spirits so I thought I'd give it a try. Since the polyurethane is laid down first the project can retain the brighter colors of the wood more than if you were to use gel stain. And it's much more permanent than using wax powder to achieve the antique look.

    The process is actually pretty easy. The paints don't have to be perfect because the dark brown covers all the cracks and crevices anyway. Over all it only took less than two hours to finish minus the drying time in between.


Posting Permissions

  • You may not post new threads
  • You may not post replies
  • You may not post attachments
  • You may not edit your posts
  •