
LHR should do something like this!

 Junior Member
LHR should do something like this!
 Senior Member
I like the idea of an LHR-sponsored contest.
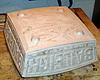
Back to the current contest entry, I cut the bottom a bit oversize, then gradually "snuck up" on the exact dimensions by trimming a fraction of an inch on all sides, then test-fitting the part. In this photo I was nearly there - the bottom fits flush with the sides now. Starting to look like a box.
Next it was on to cutting the curved frame pieces for the top and again making critical compound miter cuts for the proper fit. The frame is joined to the top with biscuits, and Ryobi mini biscuits are also used at the ends of the frames on the 45 degree angled surfaces.

Senior Member
I have a lot of sanding and finishing yet to do, but construction is pretty much done.

I had picked out some unfinished, industrial-looking exposed hinges for this project, but because of the compound curves in the top these could not simply be screwed on. I was planning to machine some bosses into the top and back, but I decided that would spoil the looks, so switched to hidden hinges. To get the top to lift clear of the curved back before opening, I used a type of hinge often seen on automobile trunk lids. I went through a few iterations of test mules before getting the geometry correct. I would liked to have carved the hinge arms for some extra detail, but I am running out of time. I have already set aside two other projects and I need to get back at them. As is, they do add a bit of that industrial look to them in my opinion. I did spend more time on them than anticipated. You might not be able to see that the wood arms have brass tubing inserts at the pivots to act as bushings.


 Senior Member
Well, I vote you should WIN! I love the creative hinge configuration!
P.S. - I think that box would be a very popular selling item in the CarveWright Project Store!
Last edited by mtylerfl; 04-18-2013 at 10:52 AM.
Michael T
Happy Carving!
╔═══ Links to Patterns & Resources for CompuCarve & CarveWright ═══╗
 Senior Member
I second Michael's assessment of your project. The hinges really adds to the whole design. Since I'm not much on the designing of projects I too would like to see the project in the Project Store
 Senior Member
I agree and I hope you do win. It is a very unique box and should win for that alone. I think, however, it would help to have a purpose. Something cool in the box. Measuring instruments, router bits, or ??? A surprise when it is opened. Something coveted by woodworkers. I know you are short on time, just an idea.
Senior Member
Thanks. If I put it into the pattern depot, I might need to make some changes. I used Ryobi detail biscuits on the joinery (much smaller than more common ones), not exactly something everyone has in their shop. Actually, the machine has been discontinued and the biscuits are getting hard to find. It is a challenging box to assemble, as the compound miter cuts have to be spot on.
bergerud, I agree regarding a purpose. I actually built this for my dado set. The box that came with the set is twice as thick as it needs to be. I was planning to build a box insert for the blades. One problem is my dado set is 8", and with the switch to hidden hinges inside the box, I'm not sure that I have enough room to fit the blades anymore! But yes, I will be putting some shop item or items in it.
Last edited by DickB; 04-18-2013 at 01:29 PM.
Senior Member
Hey bergerud, it was your suggestion - bet you can tell what this is going to be:

Senior Member
I think I know!
Senior Member
as a craftsman you know when u do a great job, that is awesum.... and u have my vote!!!!!!!
 Posting Permissions

 Reply With Quote