
I like it.


 CarveWright Staff
I like it.
CarveWright CX Packaged System - starting at $2000
CarversClub 1 Year Subscription - $150.00/year
Adv. Support w/out CC membership - $25.00/issue
CarveWright Community Forum - PRICELESS!
 Senior Member
Dick that would make a great box.
 Senior Member
I need to step up my game a bit. There are a few posts of other works in progress, one with amazing marquetry. Taking a close look at the logo, I noticed that the sides have a subtle curve, as do the top and bottom. If I used the logo as sides of a square box, no side would be flat - all six would have compound curves. Not something I've done before, but what the heck. The attached rendering is crude and incomplete, but you probably get the idea.

Junior Member
is it cheating if someone shares the logo .mpc here for others to use?
CarveWright Staff
No. They posted the logo on the other forum.
CarveWright CX Packaged System - starting at $2000
CarversClub 1 Year Subscription - $150.00/year
Adv. Support w/out CC membership - $25.00/issue
CarveWright Community Forum - PRICELESS!
Senior Member
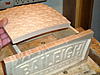
I've carved the inset "diamond plate" piece of the top cover. This was a two-sided carve in 1.25" thick maple I had left over from another project. Then cut to size on the table saw. Also working on the sides. Hard to tell in this state, but these have a very slight dish to them, so that the corners will also reflect that slight curve. I cut some scrap plywood roughly to shape to check that I have the correct compound miter angles for the sides.

 Junior Member
Maybe you could add some rivets after all deck plate is supposed to be metalOriginally Posted by DickB

http://william.bowen.com/:)
("There is a principle which is a bar against all information, which is proof against all arguments and which cannot fail to keep a man in everlasting ignorance-that principle is contempt prior to investigation."
- Herbert Spencer )
Senior Member
I had thought about adding some bolts, but decided no to bolts or rivets. I am planning to use some "industrial" hinges and a hasp.
I completed the sides and cut the critical miters. Looks like a good fit. Now you can see the subtle curve in the faces of the sides. With the straight edges of the boards no longer needed to cut the miters, the next step is to cut the top and bottom curves on the bandsaw.


 Senior Member
I talked to Keith Outen (founder/owner of Sawmill Creek) a couple days ago at the recent Vectric Camp. After catching up with each other on some things, I mentioned he might see some CarveWright owners submit some entries and he is looking forward to seeing them! Keith also said they are planning to add more contests like this - - open to everyone and it doesn't matter what machine(s) they use.
I hope some more CW users will submit some entries (start designing/carving...deadline is fast approaching).
Your Industrial Box is looking really great, Dick!
Michael T
Happy Carving!
╔═══ Links to Patterns & Resources for CompuCarve & CarveWright ═══╗
Senior Member
Thanks Michael!
I'm curious what other woodworkers think regarding the use of CNC machines. I'd be curious as to your thoughts on the matter. There are many fine woodworkers that use hand tools and methods, and of course they have developed great skill. But I'm guessing that they also have power saws, planers, bandsaws for resawing, and the like. To me, CNC machines are the next step in the evolutionary line. And of course, there is some skill in the design and usage of the machines - not the same as say a hand carving skill, but a skill that must be developed nonetheless. I do suspect that some may attribute less worth to a project on which a CNC was used. It will be interesting to see the other contest entrants and methods used. Regardless, it has been a fun project for me, and it prompted me to push my own envelope some.
Back to the project, I finished carving the box bottom and will fit it tomorrow. Also been working on the hinges. Because of all the curves, the geometry doesn't allow simply slapping on a "standard" hinge. I've changed direction on how I plan to solve this problem; still fine-tuning the solution.
I'm thinking that this basic box design, minus the logo and "diamond plate", may make an elegant box project on its own.
 Posting Permissions

 Reply With Quote