Page 1 of 6 123 ... LastLast
Results 1 to 10 of 57

Thread: Model St. Paul Union Depot

  1. #1

    Default Model St. Paul Union Depot

    I can't believe it's been almost a year since I started working on this model of the St. Paul Union Depot with a couple neighbors from the local model train club. The project leader got busy with other stuff. But the project has restarted and hopefully will stay on track.

    I first posted on this in the "Post a few ideas..." thread http://forum.carvewright.com/showthr...853#post165853 but lynnfrwd had suggested I start a new thread. The train club has several layouts, but one is based on the St. Paul area, and they chose to include the Depot. They are not making an exact model, as that would not fit the constraints of their layout. But it is definitely modeled after the depot.

    Click image for larger version. 

Name:	st-paul-union-depot.jpg 
Views:	111 
Size:	390.6 KB 
ID:	56780

    The project lead creates CAD drawings of the sides of the building with cross section. He "prints" to a .pdf, which I import into a paint program. Using the profile dimensions, I pick the appropriate shade of grey corresponding to depth of cut to make a pattern. In some cases there are beveled elements which were painted with a gradient tool. I included a slightly raised section for the window cutouts in the pattern to assist locating rectangular cut paths for these. I bring the pattern into Pattern Editor, invert it, and lower the pattern until the highest point is near zero. After I place the pattern on the board, I scale it to spec and place the window opening cutouts.

    Click image for larger version. 

Name:	Untitled.png 
Views:	98 
Size:	21.3 KB 
ID:	56781 Click image for larger version. 

Name:	left front.png 
Views:	99 
Size:	50.4 KB 
ID:	56782

    What we have so far are the front, side, and back of each of the wings that you see to either side of the columns in the photo. Note that on the prototype they are rectangular, but for the model they are square. As each side is a mirror image of the other, I only need one pattern. I use the mirror tools to place and cut left and right panels together.

    Click image for larger version. 

Name:	S6305459.JPG 
Views:	101 
Size:	1.02 MB 
ID:	56783

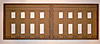
    The material is 1/2" MDF carved with the 1/16" carving bit on Normal. For the pattern, bit optimization was set to max. Windows cut with the 1/8" bit and the openings later squared off with a wood rasp. I did not cut the panels out with the CarveWright. Three sides will be assembled by mitering the corners. I will do that on my table saw after a club member puts primer on the panels front and back. I did trim top and bottom on the table saw and hand sanded the panels with 220 sandpaper and a variety of small blocks.

    Click image for larger version. 

Name:	S6305463.JPG 
Views:	108 
Size:	1.51 MB 
ID:	56784

    I plan to update this thread as the project progresses.
    Last edited by DickB; 11-03-2012 at 03:18 PM.

  2. #2
    Join Date
    Sep 2011
    Location
    Saginaw, Texas
    Posts
    1,082

    Default

    Very impressive I must say. Hopefully I will get the knack of using a paint program as you do.


  3. #3
    Join Date
    Nov 2007
    Location
    Las Vegas NV
    Posts
    1,267

    Default

    Very nice, can't wait to see it together
    Leo Davenport
    Enjoy Life Carve Something everyday

  4. #4
    Join Date
    Sep 2008
    Location
    Nuevo, CA
    Posts
    1,854

    Default

    The "dental molding" accross near the top cam out good - no chipout.
    Clint
    CarveWright StartU team member
    Web Site WWW.clintscustomcarving.com

  5. #5

    Default

    Yes, it's not exactly to scale; I started smaller but I made it a little bigger to get it to look nicer. But the MDF does carve well with really no chip out.

  6. #6
    Join Date
    Mar 2012
    Location
    Southgate, Mi
    Posts
    1,317

    Default

    +1 for MDF! First time yesterday... no chip-out.
    "Carved with Love"

    Happiness comes from within.
    But joy comes from helping others.

    Measure twice... and then sneak up on it!

  7. #7
    Join Date
    Feb 2007
    Location
    Onset, Ma
    Posts
    1,249

    Default

    DickB, That is quite the undertaking. Well explained about the three sides, I look forward to updates as they come along.


    Capt Barry

  8. #8

    Default

    I got the panels back from a club member who primed them black on the inside and white on the outside. The primed MDF has a very fine texture to it that mimics the stone of the prototype in my opinion. I mitered the outside corners and cut the panels to exact length. There is a mirror image of the three panels that I trial fitted so the set of six panels will make up the two wings of the building. The far wall is a plain interior wall, probably 1/4" Baltic birch plywood but I need to get that OKed by the project lead before I assemble these.

    Click image for larger version. 

Name:	S6305465.JPG 
Views:	93 
Size:	1.50 MB 
ID:	56896

  9. #9
    Join Date
    Feb 2007
    Location
    Orange County, California
    Posts
    384

    Default

    I am allways amazed by all of you. To take a tool that I think was invisioned to cut signs has morphed into something that I wonder if LHR thought it could. I am applouding each one of you for pushing this tool like you do. BRAVO !!!

    I look forward to seeing this project finished.

    Dave
    Experience is a doorway -- Not a final goal.

  10. #10
    Join Date
    Nov 2007
    Location
    Las Vegas NV
    Posts
    1,267

    Default

    All I can say is Ditto Dave. Unbelievable
    Leo Davenport
    Enjoy Life Carve Something everyday

Page 1 of 6 123 ... LastLast

Posting Permissions

  • You may not post new threads
  • You may not post replies
  • You may not post attachments
  • You may not edit your posts
  •