Page 1 of 7 123 ... LastLast
Results 1 to 10 of 66

Thread: my improved sled

  1. #1
    Join Date
    Aug 2009
    Location
    Whidbey Island, WA
    Posts
    2,250

    Default my improved sled

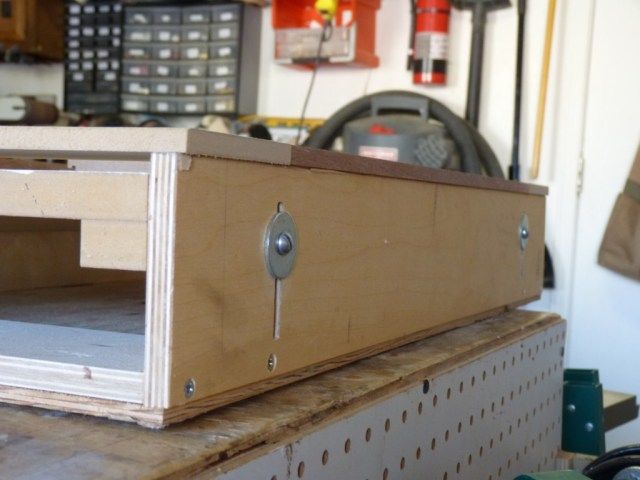
    After quite a bit of reading and comments lately on the subject of sleds, I thought I'd show y'all mine. I've made some recent improvements. A couple of you will be happy to hear that my sled requires no masking tape for the sensors now! I know I've been promising I'd post pics about this for a while now but I wanted to get my improvements done before I showed it. I do plan to make another that is less "robust" as I over-engineered this one a bit. With the new "four-inch" stretchers on the ends, I shoudn't have to worry about racking and could make the whole assembly much lighter without comprimising strength.


    The sled is basically a long "U" shape that has an inner "floor" that can be raised and lowered to accommodate different thicknesses of materials. The "floor" rides on 4 bolts which can all be loosened and then tightened to the correct material thickness. To do so, I loosen all four and then hold the material up to each corner and tighten the bolt appropriately.


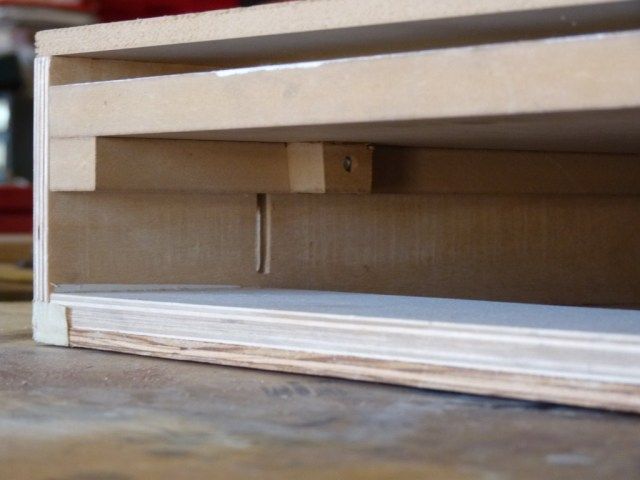
    This pic shows the grooves for the bolts.


    This shows the inside- the lower "square" holds the nut that the carriage bolt tightens into. I'll use threaded taps on my next version but I will say that the extra thickness does keep the piece from racking too much.


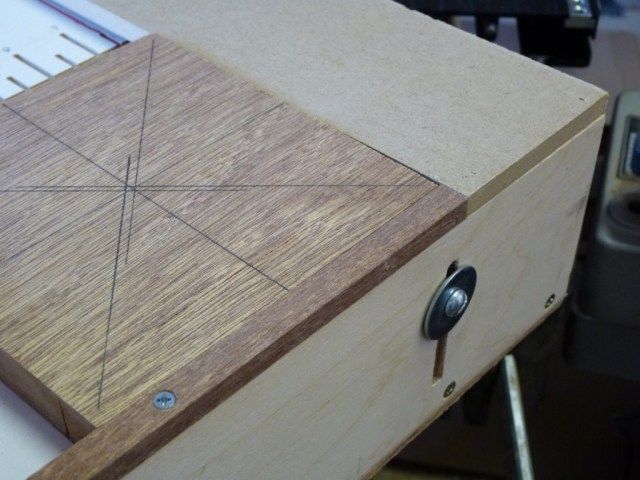
    To use the sled I put the piece to be carved into the center with double stick tape (It hasn't failed me yet... very tough stuff as I use the kind woodturners use) I carved marks showing the center of the sled with my CW-- this makes lining up the piece in the center very easy. I then put the sled all the way to the right with the left side "four-inch rail" under the sensor. I then just use the sled as normal, ensuring I use "center" for everything. Perhaps there is a better way to do all this, but it works for me and there is no loss of material.

    Let me know if you have questions,
    Lawrence
    Last edited by lawrence; 10-02-2012 at 08:33 AM.

  2. #2
    Join Date
    Nov 2007
    Location
    Las Vegas NV
    Posts
    1,267

    Default

    As usual Lawrence you have hit a home run. Great sled.
    Leo Davenport
    Enjoy Life Carve Something everyday

  3. #3
    Join Date
    Jan 2008
    Location
    As of 6/2021 Punta Gorda, Florida
    Posts
    1,461

    Default

    Lawrence... that is a nice looking sled and practical too. That would certainly eliminate having to have so many sleds. I'll have to keep your sled in mind when I do my next one.

  4. #4
    Join Date
    Sep 2007
    Location
    Northern Colorado
    Posts
    7,962

    Default

    Lawrence,

    Thanks for getting this posted for us! Great job!
    RingNeckBlues
    My patterns on the Depot
    DC-INSERT It Just Sucks!

    Proven to out perform all others!
    Buy CarveWright
    Colorado FaceBook Users Group


    All patterns and projects that I share on the CarveWright forum are for your personal carving purpose. They are not to be shared, sold or posted on any other web site without permission from RingNeckBlues Designs.

  5. #5
    Join Date
    Mar 2012
    Location
    Southgate, Mi
    Posts
    1,317

    Default

    It looks like it all can be built by the carvewright. I am so disappointed that there are no carvings on it! Carvewright Logo on the side or something! A masterpiece like that needs to be dressed up. With a sacrificial board that sled could be the last sled we have to build. Drop a new piece of luan in, carve the ruler, and ready to go! That is an awesome project.

  6. #6
    Join Date
    Jan 2010
    Location
    Elcho, Wisconsin
    Posts
    259

    Default

    Lawrence,
    Thanks so much for posting with pics and explanations! Gives me a couple of ideas to use with my"slabs" as sometimes they are not perfectly uniform in thickness. With your adjustability in the "z"axis I may be able to not worry about thicknes as long as they are mounted "flat on the cutting surface. Thanks again.
    Roger

  7. #7
    Join Date
    May 2009
    Location
    NL Canada
    Posts
    49

    Default

    Thats a great looking sled. I hope you don't mine me making one like it.
    I guess I coulds use a frame on the bottom instead of solid plywood.
    Whay size did you make it?
    Best regards.
    Chay

  8. #8
    Join Date
    Feb 2009
    Location
    Benton County, Missouri
    Posts
    1,078

    Default

    Here is mine. I use 3/4" and 1/2" MDF for the end 4". The top sled was my first and the bottom the second. On that second just have the end's fixed so they slide off the tracks and able to switch thickness depending on the project.
    You made me think and wonder if using a strip of sticky 220 grit sandpaper instead of masking tape might work well? Just don't let Al hear that
    Attached Thumbnails Attached Thumbnails Sled.jpg  

  9. #9
    Join Date
    Dec 2006
    Location
    Brunswick, GA
    Posts
    8,123

    Default

    The adjustable floor/thickness idea is ingenious! Very cool, Lawrence. Thank you for posting this.
    Michael T
    Happy Carving!


    ═══ Links to Patterns & Resources for CompuCarve™ & CarveWright™ ═══

  10. #10
    Join Date
    Jan 2009
    Location
    Brighton, TN
    Posts
    929

    Default

    Question: So to use the sled(s) that are measured the same lengths, you place the part to be carved in the proper position in Designer relative to X=0 and Y=0? So based on what I am seeing then the start of the carved part is X=4 (or there abouts) and y=0.5 (or there abouts) correct?

    Thanks,
    Steve

    Centerline
    Pattern Editor
    Conforming Vectors
    DXF Importer
    STL Importer
    2D Advanced Tools
    Designer 1.187, 2.007 and **NONE** on Mac OS 10.15.6 and Windows 10 via Parallels on Mac

Page 1 of 7 123 ... LastLast

Posting Permissions

  • You may not post new threads
  • You may not post replies
  • You may not post attachments
  • You may not edit your posts
  •