Page 1 of 4 123 ... LastLast
Results 1 to 10 of 31

Thread: Repalcement Sandpaper Gave up the Ghost!

  1. #1
    Join Date
    Dec 2010
    Location
    Maumelle, AR
    Posts
    183

    Default Repalcement Sandpaper Gave up the Ghost!

    Evening, All,

    This forum has been the source of many answers - so I thought I'd tempt fate and try once again.

    Have a C Model, with app 150 hours cut time. Virtually no problems (machine-wise) until recently.

    During a carve - one of the sandpaper belts ripped and the caring was lost. Not sure of the reason - but willing to chalk it up to operator or environmental issues.

    Ordered a couple of sets of replacement sandpaper belts. Received them in good order - followed the instructions ( as best I could) and got the machine back together. In the process, noticed that the roller with the gear was loose - adjusted and secured as per directions - all seemed good.

    2 days ago I ran my first test on the re-assembled machine - 2 different carves, one a one-sider and one being a two-sider. One-sider was a 30 min carve; the 2-sider a 2.5 hours carve. Neither were a heavy drain on the machine - pine and 12" boards. All came out fine - was quite pleased.

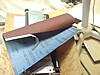
    Tonight (2 days post replacement) I began to set up a carve on the face of a baptismal fount (my first grandchild is being baptized this Sunday - and I've rebuilt all the altar furniture but this) and noticed the sandpaper belt I replaced had separated. See attached pic. Looks like the joint tape failed.
    Click image for larger version. 

Name:	sanpaper.jpg 
Views:	83 
Size:	1.36 MB 
ID:	54501
    Any thoughts on what may have caused this? I will admit that we have been fairly hot and humid here in AR - today was 106 w/high humidity and the CW is in an exterior workshop - so was probably a tad bit warmer.

    Any thoughts or guidance would be most appreciated. I am a bit reluctant to restart and put a piece of finished Bolivian Rosewood at peril - unless I need to. Hence the plea to the court.

    While we're on the subject of questions regarding this activity - please allow me one additional query:

    Step 1 of the Sandpaper Replacement directions direct one to "Remove the two Phillips head screws shown below and lift the sliding plate out. Be careful not to damage the good belt when lifting the sliding plate out."

    OK - got the two Phillips head screws out in good shape - but there was no way to "remove the sliding plate," as it has two "wings" on the bottom that protrude under the rollers. To get the sliding plate off - I've had to remove an outfeed table and remove the belt tray bolts to allow enough slack to get the sliding plate off. Works OK and doesn't place stress on the alignment plate - just doesn't jib with the directions. What am I missing?

    Thanks again for all the support provided here in the forum. Perhaps someday I'll grow up enough to be able to contribute!!

    keninar
    Ya gotta have a dream - otherwise you're just sleeping!

  2. #2
    Join Date
    Jan 2007
    Location
    NE PA USA
    Posts
    9,984

    Default

    With the side off the machine, the sliding plate moves toward you and comes off at the gear box...

    Is your wood Perfect? Any Tapers?

    The Sliding Plate should be the thickness of a Quarter away from touching the wood. If it is touching the wood it can bind and snap a belt.

    Check Head Level. With a Bit in the machine and a wide board use Options and Sensor Data and Z Data and push the bit to each side of the wood and look at the numbers for level.

    Good Luck,

    AL
    Favorite Saying.... "It's ALL About the Brass Roller"..... And "Use MASKING TAPE" for board skipping in the X or breaking bits.

    Follow ME on Facebook http://www.facebook.com/pages/Accoun...50019051727074

    www.PoconoDigitalWoodshop.com

    www.AccountabilityTag.com


  3. #3
    Join Date
    Dec 2010
    Location
    Maumelle, AR
    Posts
    183

    Default

    Thank you, Kindly, Al!

    1. With the side off the machine, the sliding plate moves toward you and comes off at the gear box... Wow! That works like a charm. Feel kinda silly I didn't figure that one out!

    2. Is your wood Perfect? Any Tapers? Wood on last carves was good - dimensioned on a tablesaw then jointer - so I'm pretty confident on this one.

    3. The Sliding Plate should be the thickness of a Quarter away from touching the wood. If it is touching the wood it can bind and snap a belt. Have tried to keep a bit of slack here - normally use 2 playing cards as spacers. Can see how it might bind and snap. Odd thing here is that the replaced belt worked fine for the 2 carves - and was in tact when I shut things down on Wed - Next time to approach the machine (tonight) noticed the separation. Position is that the belt did not snap during the carve.

    4. Check Head Level. With a Bit in the machine and a wide board use Options and Sensor Data and Z Data and push the bit to each side of the wood and look at the numbers for level. Will check this issue tomorrow am.

    Thanks for the direction. Will advise.

    keninar
    Ya gotta have a dream - otherwise you're just sleeping!

  4. #4
    Join Date
    Feb 2008
    Location
    Indian Lake, Ohio - Rts 33 & 235
    Posts
    3,967

    Default Sandpaper belts

    If all your sandpaper belts are separating at the seam, there may be a bad batch. save them, as LHR may want to check them out (presuming that is where you got them).

    Question to consider!
    How is the moisture level where you store your machine and spare belts? What is the temperature range during the year? Quick and radical change in temperature can draw moisture as well. It could affect the machine and parts. Belts could act as a sponge and metal can rust.


    When you maintain the unit with things like WD40 or other liquid based spray, it's a no-no to get the stuff on the belts. You need to protect them prior to that portion of the cleaning!
    AskBud
    AskBud Downloads =>> CLICK HERE
    Lesson added
    7/15/2012 Titles begin with "2D-3D Build a Pattern-Part-3"

    CW Vacuum Head Project =>> CLICK HERE
    AskBud Home Page =>> CLICK HERE <<=PC lessons or CW lessons

    More than 1250 AskBud patterns
    vvv-CLICK BELOW-vvv
    http://store.carvewright.com/manufac...ufacturerid=29

  5. #5
    Join Date
    Dec 2010
    Location
    Maumelle, AR
    Posts
    183

    Default

    Thanks, Bud. Yes - did get the belts from LHR. And to the un-aided eye - it seems like the adhesive just let go. But..............I'm not a CNC technician (nor did I spend last night at a Holiday Inn Express!).

    Machine in an insulated workshop - albeit with no A/c (just fans) and a wood burning stove for the winter. Temp range here in Central AR can run from 10 - 106. Normal around 25- 95. This has been an abnormally hot last month. Do a lot of close tolerance work with hardwoods - and the temp/humidity range hasn't presented a problem to this point. Always a first time, I guess.

    WD-40 is a no-no in the shop, but OK on the cycles (or to get chewing gum out of my granddaughter's hair). I've cleaned waaaay to much gunk out of my power tools to let the stuff get anywhere close.

    Thanks for the input - my un-scientific call is that something caused the joint to fail. But - I may have inadvertently contributed to it along the way.

    Loaded a new belt this eve - forecast is for 105 tomorrow - will keep ya'll posted.

    Thanks for the interest.

    ken
    Ya gotta have a dream - otherwise you're just sleeping!

  6. #6
    Join Date
    Feb 2008
    Location
    Indian Lake, Ohio - Rts 33 & 235
    Posts
    3,967

    Default

    High heat could also melt the glue! The belts are always under tension.
    AskBud
    AskBud Downloads =>> CLICK HERE
    Lesson added
    7/15/2012 Titles begin with "2D-3D Build a Pattern-Part-3"

    CW Vacuum Head Project =>> CLICK HERE
    AskBud Home Page =>> CLICK HERE <<=PC lessons or CW lessons

    More than 1250 AskBud patterns
    vvv-CLICK BELOW-vvv
    http://store.carvewright.com/manufac...ufacturerid=29

  7. #7
    Join Date
    Jan 2007
    Location
    NE PA USA
    Posts
    9,984

    Default

    Quote Originally Posted by keninar View Post
    Thanks, Bud. Yes - did get the belts from LHR. And to the un-aided eye - it seems like the adhesive just let go. But..............I'm not a CNC technician (nor did I spend last night at a Holiday Inn Express!).

    ken
    At almost 1 AM that made me Laugh... Holiday Inn Express...... Love it.... Great TV Ads... Almost as good as the Trunk Monkey....

    One more thing to check as I was reading all the new posts.... Check Head Pressure too....


    Good Luck,


    AL
    Favorite Saying.... "It's ALL About the Brass Roller"..... And "Use MASKING TAPE" for board skipping in the X or breaking bits.

    Follow ME on Facebook http://www.facebook.com/pages/Accoun...50019051727074

    www.PoconoDigitalWoodshop.com

    www.AccountabilityTag.com


  8. #8
    Join Date
    Dec 2010
    Location
    Maumelle, AR
    Posts
    183

    Default

    Humm, will check the head pressure as well. Per the directions, checked the head pressure post installation of the new belt - (but it was only 102 that day!)

    For the sake of conversation, would you suspect High or Low head pressure to contribute to this malady?

    Thanks again for the assistance.

    Ken
    Ya gotta have a dream - otherwise you're just sleeping!

  9. #9
    Join Date
    Sep 2007
    Location
    Northern Colorado
    Posts
    7,962

    Default

    High head pressure could be a cause. Putting to much force on the belts and X drive. Was 102 your temp or head pressure????
    RingNeckBlues
    My patterns on the Depot
    DC-INSERT It Just Sucks!

    Proven to out perform all others!
    Buy CarveWright
    Colorado FaceBook Users Group


    All patterns and projects that I share on the CarveWright forum are for your personal carving purpose. They are not to be shared, sold or posted on any other web site without permission from RingNeckBlues Designs.

  10. #10
    Join Date
    Dec 2010
    Location
    Maumelle, AR
    Posts
    183

    Default

    Re-checked the head pressure - 81 avg on 8 tests. Think that falls within the envelope. But I can see how excessive head pressure would place undo strain on the belts.

    The 102 was the ambient temp (as well as temp of MY head!).

    Thanks again!
    Ya gotta have a dream - otherwise you're just sleeping!

Page 1 of 4 123 ... LastLast

Posting Permissions

  • You may not post new threads
  • You may not post replies
  • You may not post attachments
  • You may not edit your posts
  •