


Does anybody have a pattern for carving out a pinewood derby car? I'd like to carve one for my grandsons.


 Member
Does anybody have a pattern for carving out a pinewood derby car? I'd like to carve one for my grandsons.
Sometimes I'm just totally underwhelmed!
Series "A" Craftsman with Carvetight.
Banned
Here is one someone posted on the forum some time back. If anything it is a good starting point.
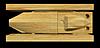
Last edited by gregsolano; 01-21-2012 at 09:13 PM. Reason: added picture
Member
Here are the dimensions that I found online.
- The overall length of the car shall not exceed 7 inches.
- The overall width of the car shall not exceed 2 ¾ inches.
- The car must have 1 ¾” clearance between the wheels.
- The car must have 3/8” clearance underneath the body so it does not rub on the track.
Series "A" Craftsman with Carvetight.
Member
Thanks! I thought I seen something here but I couldn't find it. It is definitely a start.
Series "A" Craftsman with Carvetight.
Member
I could make one for you if you post the profile of the side and the top. Or if you have some drawings.Originally Posted by jaroot

I have thought about making cars for my son and daughter who are in AWANA but they are not having a derby this year.
Alan
Member
I really don't have any ideas. I did carve one by hand once that looked more like a Le Mans car with the fenders and all but don't even have a clue on how to do it with the CW. I guess a two sided carve with the wheel recess on one side and the top of the car on the other but I don't have enough skill with 3d software to even start.
Series "A" Craftsman with Carvetight.
 Senior Member
Jaroot, if you do not mind here are a couple of pointers for the car to make it fast.
1) place the nails in a drill, remove any burs under the head, sand the nail where the wheel runs with 600 to 1000 grit to give it a smooth finish, use graphite for lub.
2) remove any burs on the plastic wheel where the nail head goes, and the back side where it may touch the wood body
3) place the wheel in a drill, sand the flat part of the wheel with 100 grit to rough it up some, and place a slight angle on the flat part from inside towards the body to the outside. This gives less wheel touching the track, less friction, and forces the wheels to run against the nail head and not the car body.
4) get the car to the max weight allowed, placing 1/3 the weight right behind the front axle grove, and the rest right behind the rear axle. This gives the car a kick when it comes off the incline and goes on the level track. Make sure you center the weight on the under side of the body.
5) try to get the axles for all 4 wheel level, no rocking when placed on a flat surface, and glue the axles in place.
6) fenders should not be lower than the bottom of the car
7) carving the car is for ascetic's only a plain wedge shape is just as good. Have no uprights or flats like seats, person etc to cause air drag.
and Last of all watch your car others do tamper with the wheels. The wheels are the most important part of the car and how smooth they turn.
Using Designer 1.187, STL importer, Center line, conforming vectors, scanning probe/PE, and the ROCK chuck.
Eddie
Member
Hi Eddie!
Thanks for the tips. I was aware of most of those things from when my boys were that age. We also trimmed the wheels down so they were basically thick disks.
Found that the best thing was to get third place in the pack as that was as good as you could do and not have to spend and entire day at the district derby.
The Grandsons don't live in the same state as me so I'll only get to send the body to them and let them and their dads finish it up.
Series "A" Craftsman with Carvetight.
 Senior Member
The rules and how to build
Using Designer Version 1.187
Donations are always welcomed, thanks send a check to my PO Box 652
BJB
PO Box 652
Yellville,AR 72687-0652
PM me for my e-mail address.
 In Memoriam
Here's a few CW Forum Threads with a little additional info on Pinewood Derby Cars
Pinewood derby car Soap box derby time! Lincoln Cent Coin Bank
Ken
Ver 1.182 on XL Pro plus Ver 1.164 and 1.175 on Windows 7 Ultimate
It Never Fails * Till * You Say It Never Fails
 Posting Permissions

 Reply With Quote