Page 1 of 7 123 ... LastLast
Results 1 to 10 of 62

Thread: Dust cap modifications

  1. #1

    Default Dust cap modifications

    I like the concept of the Dust Cap, but I don't like the 1/2" diameter elbow, which seems quite restrictive. I'd like to open that up. Also, the Dust Cap is is a fairly complex piece to build. I've had some time to work on this and played with a few ideas, and I may have come up with some ways to simplify construction and increase the airflow. This is what I am working on now.

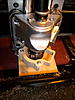
    I found that there is enough room to run a plenum on the right side of the chuck. I've made a prototype base piece with the plenum opening in place. It fits. I am using Baltic birch at this early stage, but will probably switch to cast acrylic after I get some. I'm using an aluminum base plate, at least for now, because it was easy for me to fabricate. A wooden plenum mock up proves there is space. The actual plenum may be made of glued plexiglass sheets or bent aluminum. The rectangular shape eases construction. I intend to make a manifold for the top of the plenum to exit through the slot opening in the machine's cover. The manifold and/or plenum will be attached to the top of the y-truck. There is almost enough room in the slot to fit a 1" pipe or hose without modifying the cover. If the hose is mounted in a U to the left, there is no need to account for hose rotation.

    There's no room for a dust cap top cover with my CarveTight, but it might be possible to glue a very thin and light plastic flange to the chuck, to expand the diameter of the chuck to the ID of the dust cap, acting like a piston most of the time if chips flying out of the top are a problem.

    Click image for larger version. 

Name:	S6304252.JPG 
Views:	240 
Size:	197.3 KB 
ID:	48103 Click image for larger version. 

Name:	S6304250.JPG 
Views:	231 
Size:	220.5 KB 
ID:	48105 Click image for larger version. 

Name:	S6304260.JPG 
Views:	223 
Size:	150.6 KB 
ID:	48108


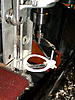
    I may try getting by with just an open cut-out for the bit plate. With the plenum right over that area, it may work. But if not I think that a sliding ring on a pivot might work. I made a cardboard prototype to test the concept of having the bit plate push it out of the way. My screw locations will need to change a bit for this to work, but I believe that once I do that the ring will fit without modifying the machine. I may cut out a ring of this type to test if it will actually work with the machine operating as my next step.

    Click image for larger version. 

Name:	S6304259.JPG 
Views:	214 
Size:	187.8 KB 
ID:	48104 Click image for larger version. 

Name:	S6304258.JPG 
Views:	188 
Size:	207.7 KB 
ID:	48106 Click image for larger version. 

Name:	S6304257.JPG 
Views:	198 
Size:	205.0 KB 
ID:	48107

    I thought I'd post this as a work in progress to get feedback.
    Last edited by DickB; 10-17-2011 at 07:24 AM.

  2. #2

    Default

    That is nice. I definitely like the idea of the "dust cap" over the other DC options. I am waiting for someone to offer one for sale. Like you said it is a complicated device and I really just don't have the want to make inequality, even though it seems like a better option. Less mess! Now with the third party store I am hoping one of you may sell a dust cap device. Bagerude has a pretty good set up but doesn't sell them. There probably is not much profit in it for the time to assemble them though.

  3. #3
    Join Date
    Nov 2008
    Location
    Vancouver Island
    Posts
    8,193

    Default

    Wow, I am happy to see some else experimenting. I wonder, though, have you made and tried the Dust Cap? My first one had a 3/8 elbow and that actually worked fine. I thought I would make it as big as I could and so it ended up being 1/2. I have had no problem whatsoever with the elbow being restrictive. Even when carving with the grain and those planer like shavings. It even sucks up metal. (Maybe you did not notice the how the vortex action throws the chips into the pipe.) The main problem with my Dust Cap is that it is perceived as complicated to make. It works just great. In my mind, its short comings are that it obscures the bit (I like to watch) and that the hose comes out of a cut hole in the front of the machine.

    I thought long and hard about different ways to do things and, well, you saw what I came up with. I gave up on trying to go up the side of the carriage because of the bit plate on the right and because of no room on the left. I really wanted to go up on the left and cross over to the right to go out. I thought for awhile about having the Dust Cap swing out of the way for the bit plate and decided that it would be too complicated and risky. If it could swing then it might swing at the wrong time and hit the chuck or the bit or it might get jammed into the left side of the machine. Power to swing it out could not come from the bit plate because it has enough trouble as it is! You cannot have an open slot for the bit plate as that is exactly the direction the chips fly. Vacuum will not get the big chips. I concluded that the only way to deal with the bit plate was either to replace it or go under it. The original bit plate can be modified to give enough space under it. Again, more complication, who is going to grind up the old one or make a new metal bit plate? And don't forget, the cap has to be easily removable for cleaning and for using the scanner.

    I am sorry, I do not want to bring you down. I know you are having fun with this. (Of course, I wish you would have made my Dust Cap and helped to improve it. I needed someone with the CT to test it.)

    You know, if you really want to improve the Dust Cap, it has to have no moving parts and be easy for everyone to buy!

  4. #4

    Default

    I have not built your Dust Cap and tried it. I set out to do that, by downloading and studying your excellent mpcs and photos, and examining my machine. I was convinced by your posts that it worked and that it would be a significant improvement over my current setup; that's why I started down this path. In doing so, it occurred to me that some changes could possibly be made that might make it simpler and easier to make and build. Simpler and easier is better, in my mind. I agree that no moving parts would be better, so I thought I would try that. If not, I have this idea for the one moving part that does not require modification of the bit plate. No modification to the machine is better if it can be made to work. I will have to try the swinging ring idea to be convinced that it won't work, so that's probably what I'll do next. If the bit plate can't swing it, perhaps a cam on the ring extending to the left that contacts the wall of the machine as the truck moves towards the wall could work (just like the bit plate itself). The plenum has the potential for about 3x the airflow of the elbow. That has got to be better. My table saw has a 3" dust port, and it works quite well. But if it had a 4" port, I'm sure I would use it. So if I can construct a larger port for the Dust Cap, and simplify it by eliminating the bearing and the two-piece, close-tolerance elbow, why not?

    You state that you wish that I had made your Dust Cap and tried to improve it. In my mind that's exactly what I'm doing, although maybe not in the order that you envision. I guess I don't see the need for me to replicate what you have done exactly and then go from there. You have already done that and provided great detail on your work; I don't feel that I need to replicate it to take advantage of it.
    Last edited by DickB; 10-17-2011 at 08:08 AM.

  5. #5
    Join Date
    Nov 2008
    Location
    Vancouver Island
    Posts
    8,193

    Default

    You know, Dick, I originally made the Dust Cap for myself. I did not care how hard it was to make, I just wanted a trouble free and effective dust system. I was quite happy with my original plexiglas version, the aluminum bracket, and the on board bit plate. I got so much positive feedback from the forum members that I was inspired to design the parts so the Carvewright could carve them. I spent two weeks of my summer vacation to perfect the process and make it as easy as I could to make. Well you know what happened - nothing. My advice to you is to decide what you are making. Either you design it for yourself or you design it to make and sell. If you think you are designing something that others will make, you may be disappointed. You would think that Carvewright users would be on the most part gifted makers of things. I am starting to think they are, on the most part, consumers. Ed Baker knows something we do not. When I first saw his rotary jig I thought, why would he make these things and sell them? Why not just sell the plans? The jig is easy for any woodworker to make. They bought them up.

    On the topic of Dust Cap improvements, let me ask you this: If the Dust Cap with the 1/2 pipe gets 99.5% of the dust, why would you think that a higher flow volume would be a big improvement? Are you going to radically change the design to get 0.02% more dust? As for the bit plate, I originally thought it was an extra, undesirable complication to have to replace it and to have moving parts. As I have used the Dust Cap, my thoughts have changed. It is not a bug but a feature. That original bit plate was an undependable thing with scraping metal on metal contact and a horrible thwack. I am happy to be rid of it. (You really do not want it wacking at your cap!)

    I believe that the ultimate dust system is more like what I tried with the Dust Shoe. An attempt to make dust collection a built in system. If I were to continue research on this topic, this is the direction I would go. I would design a new, higher bit plate and have the cap slide under it. The parts would have to be manufactured and sold.

    Anyway, I challenge you to better my Dust Cap and I look forward to seeing what you come up with. I wish you the best of luck.

  6. #6

    Default

    Thanks for your comments and insights.

    In addition to wood products, I have made and sold other items: specialty automotive electronics. In fact I still am building and selling some electronic items that I first designed years ago. So I have a little experience with this.

    I have not designed anything as a "product"; everything I have done, I did for myself. But then others who saw what I did asked if I would make them one, and in a few cases that grew into a small hobby business. The Dust Cap is no different. I'm doing it for myself and my own machine. Maybe it becomes a product down the road, I don't know. That depends on a lot of things. BTW I'm guessing that Ed did this as well - made it for himself first, then decided to sell. As it happens, I have a couple of projects in the pattern depot - again, these were items that I made for myself, not to sell - and I am very interested to see how these designs sell versus actual physical product. I've only a few months experience with the sale of designs, so it's too early to draw conclusions.

    As I look at the aggregate of projects displayed in these forums, the majority appear to be "single-board" projects: plaques, signs, picture frames, etc. Your Dust Cap is not that type of project. So it is not so surprising to me that there has been little interest in your mpcs. (I have studied them and used them as a staring point.) As you see by the response to Ed's product and comments on the Dust Cap, there is definitely interest in a Dust Cap product if not a project. I think we saw this with at least one of the dust collector projects that was posted, where some users wanted to buy, not make.

    The design change in the flow was not motivated primarily to increase volume or flow, but to simplify the build for myself. Turns out that the increased flow comes for free with this change. If I can get it, why not? As far as the bit plate goes, I had some issues with sticking bit plate at first, fixed with a bit of lube. But for hundreds of hours now, I have had no problem. Perhaps it loosened up with wear, I don't know. Again I am making the change for myself first and foremost. I cut a rotating ring today and affixed a small spring; the bit plate had no trouble pushing it out of the way. So I think it will work fine, and that's one less mod that I have to do for myself and yes, if this turns into a product, for others to do. BTW some find the thwack of the bit plate a reassuring indication that all is well. To each his own.

    I've stated before and I'll say again, for the life of me I don't know why LHR did not facilitate dust collection from the outset. You buy a $50 sander and it has a dust shroud and outlet for a vacuum or dust collector. As I'm sure that you have discovered in working on your Dust Cap, there are needless restrictions for accommodating a proper dust cap or shoe built into the machine design. The head casting could easily have been made a bit differently to allow really nice dust collection right at the cutting/carving bit. Oh well.

    For whatever it's worth, I give a big THANK YOU for coming up with this concept and developing it into a working device. I think it is the best solution presented so far, and I am anxious to see the concept in action on my own machine. Your posts, mpcs, pictures, and information have been invaluable.

  7. #7
    Join Date
    Jan 2007
    Location
    NE PA USA
    Posts
    9,984

    Default

    Quote Originally Posted by bergerud View Post
    I would design a new, higher bit plate and have the cap slide under it. The parts would have to be manufactured and sold.

    Anyway, I challenge you to better my Dust Cap and I look forward to seeing what you come up with. I wish you the best of luck.
    I love your Cap Design.... When I placed a block of wood on top of the bit plate to simulate making it higher it gave me a Air Carve.... so that distance in Height is a Standard to the machine and can't be moved.

    AL
    Favorite Saying.... "It's ALL About the Brass Roller"..... And "Use MASKING TAPE" for board skipping in the X or breaking bits.

    Follow ME on Facebook http://www.facebook.com/pages/Accoun...50019051727074

    www.PoconoDigitalWoodshop.com

    www.AccountabilityTag.com


  8. #8
    Join Date
    Nov 2008
    Location
    Vancouver Island
    Posts
    8,193

    Default

    Thank you for the compliments Dick and Al. It is nice to hear positive feed back for my efforts. Al, I only meant to gain 1/4 or maybe 3/8 an inch of height under a new bit plate. And Dick, about the thwack! Some else had the same comment that it was reassuring to hear it. I want you to think about that. You like the thwack because it means the thing is not failing. Believe me, it does not take long to forget the thwack when it, silently, always works.

  9. #9

    Default

    Well, here's what I've come up with, keeping the bit plate in place. I'm using Baltic birch for now to test and fit the parts. I have some HDPE in the shop which I may give a try. The parts don't need to be glued, so that material could work. Or I will get some cast acrylic. But the birch parts are functional, so I will likely give them a try to see how well this concept works (or doesn't) with the CarveTight. I found a source for 1" x 1/2" rectangular aluminum tube to route the vacuum up the side of the chuck, so I will not need to fabricate that. It should be here soon. I am on to working on the manifold for the top.

    Click image for larger version. 

Name:	nozzle4.jpg 
Views:	137 
Size:	767.2 KB 
ID:	48214 Click image for larger version. 

Name:	nozzle3.jpg 
Views:	114 
Size:	826.3 KB 
ID:	48215 Click image for larger version. 

Name:	nozzle2.jpg 
Views:	115 
Size:	802.1 KB 
ID:	48216 Click image for larger version. 

Name:	nozzle1.jpg 
Views:	109 
Size:	799.8 KB 
ID:	48217

  10. #10
    Join Date
    Jun 2007
    Location
    Indiana, PA
    Posts
    2,560

    Default

    I am really liking the look of this. I have been following this thread with great interest since I am still relying on a downdraft system myself. If this ends up working well, I think I will opt for this design over the RNB DC insert. (Not that there is anything wrong with that solution either.... just the cap makes more sense to me.)
    Doug Fletcher

Page 1 of 7 123 ... LastLast

Posting Permissions

  • You may not post new threads
  • You may not post replies
  • You may not post attachments
  • You may not edit your posts
  •