
This place has some cool wooden clock designs and sell plans with DXF files so the conversion to the CW is a snap: http://www.woodentimes.com/


 Junior Member
This place has some cool wooden clock designs and sell plans with DXF files so the conversion to the CW is a snap: http://www.woodentimes.com/
Frederick Potter
Editions by Frederick
http://www.editionsbyfrederick.com
Keep 98% of the dust out of your machine with this free dust collector:
http://forum.carvewright.com/showthr...e-final-answer
 Senior Member
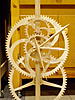
I cut some test hours gears and reassembled the parts using concentric brass tubing. Everything is working as expected. I need to work on a clutch mechanism between the seconds and minutes gears. This will allow the time to be set by simply moving the minutes hand.
For the actual clock, I'm going to make the pinion gears out of 1/2" hardwood. These will look better and allow for a better fit of the gears. I'm also going to make the arms and gear ring of the larger gears a bit thinner for a more delicate look. For my first clock I will cut the larger gears out of 1/4" Baltic birch, but in the future I may try a hardwood like cherry. I will design some sculpted arms that will be carved instead of cut for a more complex and interesting gear. I have some ideas for a ring with numbers but haven't started that design. I haven't thought much about hands designs. I think I'm going to stick with a single piece frame like the test mule.
My timing motor hasn't arrived yet - I will have to follow up on Monday.
 Senior Member
This is a fun thread to follow! The clock is really coming together nicely!
Michael T
Happy Carving!
╔═══ Links to Patterns & Resources for CompuCarve & CarveWright ═══╗
Senior Member
A lot of threads show finished work, but I thought it would be good to follow a work in progress and allow others to make comments and suggestions as the project progresses.
Senior Member
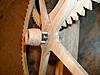
I've been working on the actual clock now. I cut large gears out of 1/4" Baltic birch and pinions out of 7/16" oak. The frame is a simple stick of mahogany which I may or may not shape a little.
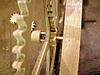
I came up with this clutch to disengage the seconds drive in order to set the clock. You just push the button on the back of the clock, then rotate the minutes hands (which drive the hours hands of course) to set the time, then release the button. The seconds hand will keep moving if the motor is running.
Here's a numbers ring design I am working.
I learned that my timing motor is on backorder, but I found another supplier and it may arrive tomorrow.
 Junior Member
Very cool. I like the spring disengage to set the clock.
Senior Member
I like the style of these, but as it turns out I pushed the envelope pretty hard in making them. They're a bit delicate. The hands are only 1/4" deep at their deepest, and not easy to carve. After putting them on the clock, I decided that they need to be bigger. So I will refine them with a bit more heft and probably use the same 7/16" stock that I used for the pinion gears to make them.
 In Memoriam
Looking better every day!
Thanks for Sharing your Photos
Ken
Ver 1.182 on XL Pro plus Ver 1.164 and 1.175 on Windows 7 Ultimate
It Never Fails * Till * You Say It Never Fails
Senior Member
Yes, the project is looking fantastic!
Michael T
Happy Carving!
╔═══ Links to Patterns & Resources for CompuCarve & CarveWright ═══╗
 Senior Member
That is looking great. I am impressed!
Tom Watson
Two CW's and D.C.-Top Mount Insert @ Ringneckblues.com Get the dust out!!
50" X 48" PDJ Pilot Pro CNC http://www.pdjinc.com
Check out my Facebook page for current carvings at http://www.facebook.com/signsinwood
Watsons Wooden Words http://www.signsinwood.com & Messages in Wood http://www.messagesinwood.com/
 Posting Permissions

 Reply With Quote