Results 1 to 7 of 7

Thread: Tribal Squadron symbol

  1. #1
    Join Date
    Aug 2009
    Location
    Whidbey Island, WA
    Posts
    2,250

    Default Tribal Squadron symbol

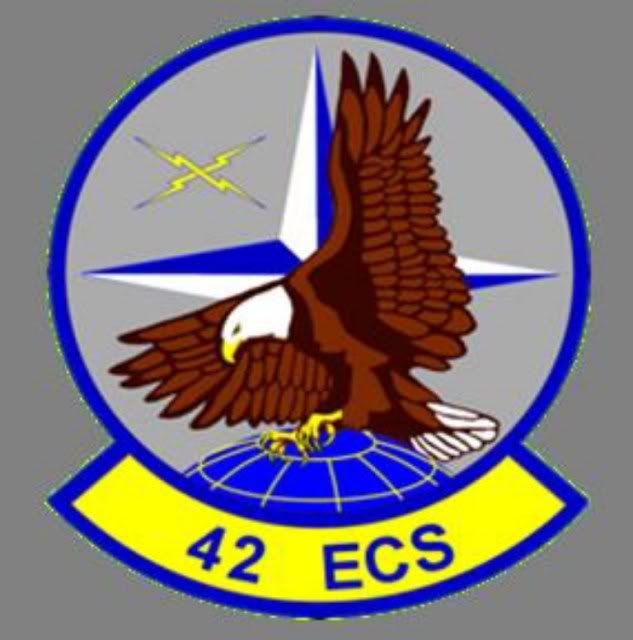
    My Squadron is the 42ECS, an historic squadron (past members included Iceal Hambleton, callsign "Bat 21" on which the book and movie are based)

    Our patch is nice, but I think it lacks a certain "oomph" so I decided to get artsy and create an alternative to hang on my wall in my office

    Here is our squadron patch


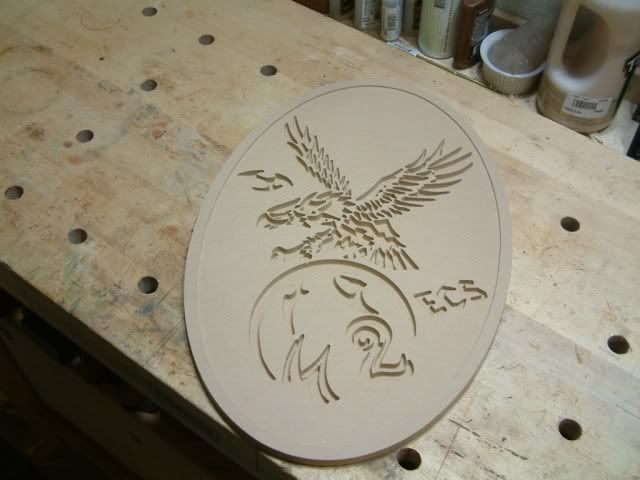
    (for the actual carve, I added in the carved ECS)

    The carve is 1/2 MDF, so my cost in materials was VERY low.
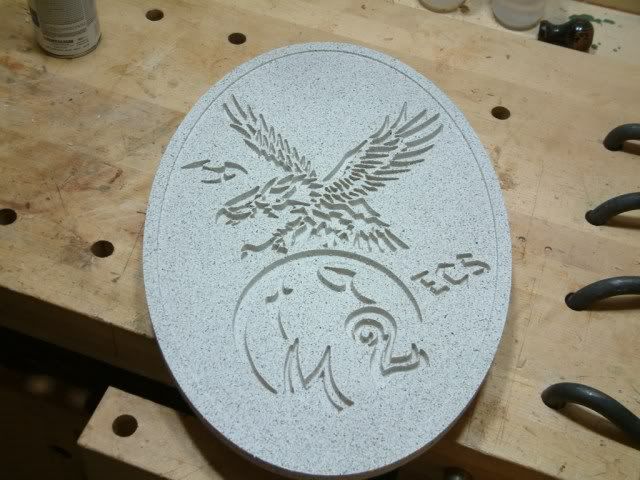
    I then sprayed on an oil based primer and sprayed it with "stone effect" spray paint.

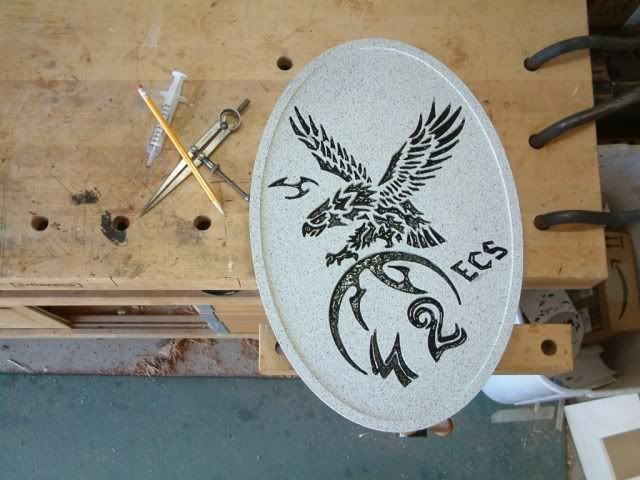
    Finally, I squirted thinned black gloss paint into the carvings with a syringe I got from my local pharmacist (they are used for dispensing medicine to children) The syringe gave me very good control-- I touched up any oopsies with a toothpick dipped in a puddle of the stone effect paint.


    I'll attach the MPC and a DXF (I didn't use it) in case anyone wants them-- who knows, maybe I'll even get an order or two from this project, but no matter what, I enjoyed just doing it for myself.

    Thanks for looking
    Lawrence
    Attached Files Attached Files
    Last edited by lawrence; 04-02-2011 at 04:27 PM.

  2. #2
    Join Date
    Feb 2011
    Location
    Beaufort SC
    Posts
    86

    Default

    That Looks Great. I'm Glad I'm not the only one doing Patches. Great Job.
    Last edited by lilskip; 04-02-2011 at 08:55 PM.
    David Greer
    "Woodworking is the Illusion of Perfection"
    Shadowboxs, Kbar Holders, Sword Holders Etc.
    Find Me on Facebook
    Email Me if you need something

  3. #3
    Join Date
    Feb 2008
    Location
    Maryland, USA
    Posts
    224

    Default

    L, looks great! Nice, balanced design based on the patch, and you can never go wrong with the stone effect finish!

  4. #4
    Join Date
    Apr 2009
    Location
    Snellville, GA
    Posts
    1,475

    Default

    Looks great Lawrence,

    I have not tried the stone effect up to now but I'm going to now that I see how well it can turn out. I did find I was applying very heavy primer coats and having to sand back to fill the voids/surface pits in the MDF. Maybe I just need to find a better grade at the Big Box store. Did the black paint flow out fairly well within the carved areas or did you have to lead it to the corners and narrow cuts?
    Thanks for sharing this as I really like your personal re-work of the "patch".
    Fair winds,

    Capt Bruce
    Kinney deSigns http://kinneydesigns.us
    CarveWright START U Team Member.

    30 year USN SEABEE, the original Weapons of Mass Construction.
    Designer Ver 1.187 and 2.007, Ver.3.001 One 2009 B CW w ROCK and a 5th Year Anniversary C CW
    Rotary Jig, 2D and 3D, Tracing Probe, DFX and STL Importers

    .

  5. #5
    Join Date
    Feb 2007
    Location
    Upstate NY USA
    Posts
    952

    Default

    I like it!
    " The Hurdier I Go, The Behinder I Get"

  6. #6
    Join Date
    Aug 2009
    Location
    Whidbey Island, WA
    Posts
    2,250

    Default

    Thanks all, I sure appreciate the supoort.

    Capt Bruce, The stone effect paint is pretty darned good at making MDF look great-- just make sure you prime it well with the base coat of the stone effect you are using-- this cuts down on the amount you have to use to make the piece look good.

    As for non "stone" painting... Fiberboard comes in different density types (Medium Density, High Density, Low Density) and there is also a type that does not contain formaldehyde. However, I suspect that your past problem instead lies in the TYPE of primer. It is vital that you use an oil-based primer on the MDF or the carving will swell and you will get a VERY rough surface. When painting, I've also found that covering cut/exposed edges with drywall mud/compound, sanding that edge smooth, and then covering the whole thing in a good oil based primer will do wonders to make the porus material soak the primer up as evenly on the edges as it does the surface. It is possible to use shellac based primer, but that can still sometimes cause problems that need to be sanded out (though not nearly as badly as a latex primer will do). I usually only use shellac based primer if I am shooting it on with my HVLP, if I am brushing, I always use a high-quality oil-based primer. It is VERY possible to get amazing, almost plastic or metal looking surfaces (if that is what you want) on MDF if you mud the edges and prime the piece with oil based.

    As for painting the piece, I watered latex gloss black paint down about 10-15% with water and then carefully shot a puddle into the middle of each carving. I then used a toothpick to "lead" the paint (probably just how you are picturing it) It really was not much more than breaking the surface tension of the paint and pushing it into the recess, wiping the toothpick off, and repeating. Eventually (unfortunately about 1/4 of the way into the paint job) I got practiced enough at it to create perfect recesses, but it took some practice to nail down the technique. For the REALLY small recesses I used the toothpick as an eyedropper and just tapped the paint into place.

    Sorry to ramble on... I hope this hasn't been to wordy and helps you.

    All the best,
    Lawrence

  7. #7
    Join Date
    Apr 2009
    Location
    Snellville, GA
    Posts
    1,475

    Default

    Thanks Lawrence,

    Not too wordy at all and spot on to what I was trying to understand. Thanks as always.
    Fair winds,

    Capt Bruce
    Kinney deSigns http://kinneydesigns.us
    CarveWright START U Team Member.

    30 year USN SEABEE, the original Weapons of Mass Construction.
    Designer Ver 1.187 and 2.007, Ver.3.001 One 2009 B CW w ROCK and a 5th Year Anniversary C CW
    Rotary Jig, 2D and 3D, Tracing Probe, DFX and STL Importers

    .

Posting Permissions

  • You may not post new threads
  • You may not post replies
  • You may not post attachments
  • You may not edit your posts
  •