Page 6 of 10 FirstFirst ... 45678 ... LastLast
Results 51 to 60 of 100

Thread: Fletcher's DC - carve it yourself

  1. Default

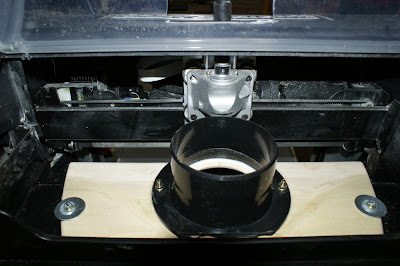
    I bought some attachment parts from Rockler and they fit the Fletcher DC perfectly. All I did was cut a hole in the clear cover plate and the first peice fits snugly right on the wooden DC and then I close the cover and the threaded dust collector attachment fits right over the first one and even helps to keep the cover closed. I also have a coper wire screwed into one of the screws holdong the DC on the machine. I also put a sock in one side of the DC to get more air flow on the Touchpad side of the machine. I'm telling you I have hardly any dust left in the machine at all.

    Click image for larger version. 

Name:	IMG_3271.JPG 
Views:	392 
Size:	533.9 KB 
ID:	43551Click image for larger version. 

Name:	IMG_3272.JPG 
Views:	378 
Size:	508.2 KB 
ID:	43553Click image for larger version. 

Name:	IMG_3270.JPG 
Views:	398 
Size:	526.9 KB 
ID:	43549

    Alan
    Attached Thumbnails Attached Thumbnails IMG_3268.JPG   IMG_3269.JPG  

  2. #52
    Join Date
    Sep 2009
    Location
    Milton, ON, Canada
    Posts
    176

    Default

    Nicely done Alan!
    ROCKin' with my Dust Collector - Get the mpc here
    http://forum.carvewright.com/showthr...ve-it-yourself

  3. #53
    Join Date
    Feb 2007
    Location
    Onset, Ma
    Posts
    1,249

    Default

    Nice work Allen. I will carve mine now after seeing your set-up. Thanks , Capt Barry

  4. Default

    Hello, Thanks for the DC design.

    Any chance moving the hose attachment ring a little to the left side? Wouldn't this help in two ways:

    1) have more suction on the left where most of the carves are happening.

    2) keep the hose out of the way to make changing bits easier?

    I understand some suction on the right side would be sacrificed.

    Thanks,
    Jeff

  5. #55
    Join Date
    Dec 2008
    Location
    Thomasville NC
    Posts
    522

    Default

    I haven't tried it yet. But next carve i plan on putting tape over the right side to see if it helps more.

  6. #56
    Join Date
    Oct 2009
    Location
    Rockland County, NY
    Posts
    188

    Default

    I am running this project now and just flipped the board to continue the FRONT side of the project... Is it possible that the machine asks for the 1/8" cutting TWICE? I am pretty sure it asked for the 1/8" cutting bit which I loaded. After it ran through it's checks it stopped and is again asking for the 1/8" cutting bit.. This is the first carve I've done where the DRILL tool is used and I'm thinking maybe it asks for the 1/8" bit twice because of that?

    I'm a little nervous to start the front carve until I know for sure if I read everything on the screen correctly. I guess my alternative is to delete the REAR carve and restart the project with just the front carve so I'll be able to start the process over.
    John

  7. #57
    Join Date
    Feb 2008
    Location
    Indian Lake, Ohio - Rts 33 & 235
    Posts
    3,967

    Default

    Quote Originally Posted by jgowrie View Post
    I am running this project now and just flipped the board to continue the FRONT side of the project... Is it possible that the machine asks for the 1/8" cutting TWICE? I am pretty sure it asked for the 1/8" cutting bit which I loaded. After it ran through it's checks it stopped and is again asking for the 1/8" cutting bit.. This is the first carve I've done where the DRILL tool is used and I'm thinking maybe it asks for the 1/8" bit twice because of that?

    I'm a little nervous to start the front carve until I know for sure if I read everything on the screen correctly. I guess my alternative is to delete the REAR carve and restart the project with just the front carve so I'll be able to start the process over.
    YES, it does (at times).
    AskBud
    AskBud Downloads =>> CLICK HERE
    Lesson added
    7/15/2012 Titles begin with "2D-3D Build a Pattern-Part-3"

    CW Vacuum Head Project =>> CLICK HERE
    AskBud Home Page =>> CLICK HERE <<=PC lessons or CW lessons

    More than 1250 AskBud patterns
    vvv-CLICK BELOW-vvv
    http://store.carvewright.com/manufac...ufacturerid=29

  8. #58
    Join Date
    Oct 2009
    Location
    Rockland County, NY
    Posts
    188

    Default

    Thank, Bud. I ended up reloading the mpc with only the front carve and I did notice it asked for the DRILL and CUT bit separately, even though it's the same bit for both processes. I didn't notice that subtle difference the first time.
    John

  9. #59
    Join Date
    Sep 2009
    Location
    Milton, ON, Canada
    Posts
    176

    Default

    Quote Originally Posted by usd5000000 View Post
    Hello, Thanks for the DC design.

    Any chance moving the hose attachment ring a little to the left side? Wouldn't this help in two ways:

    1) have more suction on the left where most of the carves are happening.

    2) keep the hose out of the way to make changing bits easier?

    I understand some suction on the right side would be sacrificed.

    Thanks,
    Jeff
    You're welcome... Most of my carvings were using the full width, so I designed it to work for the whole width. Changing bits has never been a problem for me with the DC in place.
    ROCKin' with my Dust Collector - Get the mpc here
    http://forum.carvewright.com/showthr...ve-it-yourself

  10. #60

    Default

    I want to thank the OP for the MPC for this dust collection modification.

    I received my first carvewright last week and I was itching to get it to work. After spending a couple of days watching the instructional video, reading the hardware and software manuals cover-to-cover, and perusing the forums for any last-minute 'gotchas', I put together a basic design for a bathroom sign last weekend and put the unit to work.

    I was surprised (although shouldn't have been, I suppose) about the amount of wood dust that collected in nooks and crannies of the machine. I could rapidly see how this was going to become a major issue with long-term maintenance and care of the machine. I have to admit I am surprised that CW doesn't have a better dust collection system in place -- another poster alluded to this, you would think the addition of a dust-collection port would help them significantly with warrantee issues and overall, better customer satisfaction.

    Anyway, I have a delta 50-850 unit for DC. My workshop is small, so all my tools are portable on casters for easy relocation when they're not in use. To use my carvewright, I have to set it on my table saw and roll up the delta unit to its side.

    Being I was excited to get started using my unit, I found this DC modification and decided to implement it. I used a spare piece of poplar I had laying around which was the right size... I figure this will paint up nicely. I didn't, however, have the patience to take the circular connector and glue it up, so I took one of my 4" PVC DC flanges I had laying around and attached it to the output port using two small screws from the underside of the unit, after trimming it to size using my dremel. I also used a fair amount of silicone sealant on the inner and outer edges to help seal the unit. I found man-handling my heavy-duty 4" DC hose directly to the adapter a major PITA, so I found a 3" PVC elbow to install on the unit. I secured this with a single screw in the front (near the cutting head, not pictured) to keep the elbow from wanting to sag under the weight of the heavy-duty hose.


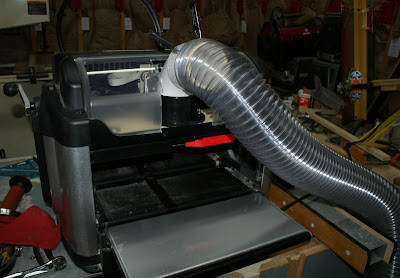
    Once installed, I carved out a new sign for one of the stalls in my barn... and it worked beautifully. Virtually no dust on the workpiece... still a small amount of fine particulate matter inside the unit and along the backside, but compared to previous carvings, a 1000% improvement!


    I think the only other modification to this setup I may make is to switch the 90 degree elbow to a 45 degree elbow.... I'll have to pick one up next time I'm near the depot.

Page 6 of 10 FirstFirst ... 45678 ... LastLast

Tags for this Thread

Posting Permissions

  • You may not post new threads
  • You may not post replies
  • You may not post attachments
  • You may not edit your posts
  •