jonm3, there are two common causes for the lever problem. One is a pair of wires that run from the cut motor to a switch in the cover. The head can get hung up on these wires if they are not out of the way. I fought with this problem until I came up with a fix. I drilled two pairs of holes on the cover and installed zip ties through the holes to secure the wires out of the way.

(There are many little ways in which the machine could have been designed and built better in my opinion; this is one of them.) The other common problem is lack of lubrication. Spray some lube on the pivot and work it a few times.
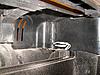
The x, y, and z servos all get feedback information from rotary optical sensors. These sensors have covers on them but they do not seal tightly. (Again, a small detail that could have been implemented better). When I started getting Y errors I searched the forum and learned about dust getting into these sensors. I was shocked to find a good teaspoonful of dust in both the y and z sensors. I was amazed that they worked at all. I ran a fine bead of silicon seal around the covers when replacing them, which has helped. But I just cleaned all three sensors again last week and that cured a minor z axis registration problem that I was having.
Dust is the enemy of this machine and a good dust collection system is the answer. If you don't have one, get or make one. A top collection port is essential, but I also use downdraft in combination. You will be amazed at how much this improves reliability of the machine. Again why the makers don't include a dust collection port or offer one as an option is beyond me.
This forum can be your friend and in my opinion is almost a requirement to successfuly operate this machine. If you are having a problem, almost certainly others have too, and have taken the time and effort to post with solutions. I search the forum whenever I encounter a new problem, and don't stop when I find an answer, but try to find multiple answers, then see which one or ones are most like my problem.
We have all had our frustrations with this machine. Hang in there, search the forums, use dust collection, perform maintenance, and you can do amazing things with the machine and software.


 Reply With Quote


