
Ken I always enjoy your creativity, that one almost looks alive.


 Senior Member
Ken I always enjoy your creativity, that one almost looks alive.
Using Designer 1.187, STL importer, Center line, conforming vectors, scanning probe/PE, and the ROCK chuck.
Eddie
 Member
One of the project I'm working on, this is the 3D model, soon to be converted into a pattern for the CW. I reproduced the shape from a photograph.
May you be well, may you find happiness! : - )
"Exaggerated self-importance is deemed an individual fault, but a racial virtue." From Kelly Millar
 Senior Member
Y'know...if you put that on the Guest Bedroom Wall, maybe they won't stay long.Originally Posted by Kenm810

Livin' Life
Lovin' My Carvewright
Senior Member
Well here is a suggestions, but looks like it is back to the drawing board to make the pattern for the sides mesh up with 45 deg miters. So here it is knowing the corners may have to be fixed.
The MPC are in a zip file located at http://www.lambswoodworking.com/carvewright/box.zip
just click the link to download.
link will give you the corrected version. file is 3.5 meg
Last edited by eelamb; 07-08-2010 at 09:26 AM.
Using Designer 1.187, STL importer, Center line, conforming vectors, scanning probe/PE, and the ROCK chuck.
Eddie
Senior Member
OK I have corrected the front and end patterns for the box. Now the rounded edges extent past the lower carve area. thus allowing for the 45 deg miter. The corrections have been uploaded to my site so if you click the link in the other post you will get the corrected version.
Using Designer 1.187, STL importer, Center line, conforming vectors, scanning probe/PE, and the ROCK chuck.
Eddie
 Member
That is a very cool project, I hope to see it in your store when you get done!!!
Craig
 Senior Member
Is the link working correctly? Just clicked on it and it gave me an error message....
JerryB:.
CarveWright START U Team Member
Using 1.187, Conform, PE/Probe, Centerline.
"Let's start sharing PTNs instead of MPCs so ALL SW versions can view & share"
Senior Member
Sorry had carvewright spelled wrong. It is fixed now. thanks for letting me know.
Using Designer 1.187, STL importer, Center line, conforming vectors, scanning probe/PE, and the ROCK chuck.
Eddie
 In Memoriam
A new one for today
Last edited by Kenm810; 04-13-2012 at 12:39 PM.
Ken
Ver 1.182 on XL Pro plus Ver 1.164 and 1.175 on Windows 7 Ultimate
It Never Fails * Till * You Say It Never Fails
Member
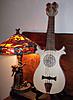
Good Day every one!
I have been very busy (Good thingsJ) I am on the final sanding of Citole #5 for a new owner and half way done with #6 a little sneak peak for you and will get back with a photo shoot,
Just wanted to stop in and say Thanks for the entirely Cool project’s all of you! On all the treads.
Here is one I think turned out pretty good IN DESINER any way I started this way back “Antique Light Stand” I had in mind to sell this one, when I found out how many hours it will take to make this happen It may not be done for awhile. So hear you go many hours from concept build notes to PS and designer they are all saved with version 1.17.
The top aprons are left blank for your special touch, the too large file I have is set up for 5-5 timber with the front side pattern inverted and flipped vertical as a grope on back side, and you also could cut the contours with a band saw, the rectangles with carve reigns are for lining up the two sides and can be taken out before carve
I will post remaining files after this post
Cheers and hope you enjoy, this was a lot of fun to make
~Ray
Last edited by RayTrek; 07-09-2010 at 09:52 PM.
 Posting Permissions

 Reply With Quote