
Michael,Originally Posted by mtylerfl

I really like your design better than the one that I built. I have one question: How do you lift the unit to empty the trash can?


 Senior Member
Michael,
I really like your design better than the one that I built. I have one question: How do you lift the unit to empty the trash can?
Steve
 Senior Member
Ha! I was worried about that when I built it...it came out heavier than what I thought. However, it turns out I am still strong enough to lift that baby onto the top of the can. Glad it's a 30 gal can, as I don't want to have to lift it off/on too often. I am thinking of installing a clear tall plexiglass "window" or maybe a door (Angie did something like that) so I can see when it needs emptying instead of guessing.
I have not emptied it yet and don't know how much debris is in there, at the moment. All I know is that it sucks up everything.Angie installed a few large eye hooks on the top disc for the purpose of attaching some type of rope or chain lift mechanism for his. Another thought...I could make a small door opening near the bottom to vacuum the stuff out with one of my Shop Vacs, instead of lifting off the assembly.
Last edited by mtylerfl; 08-03-2014 at 07:40 AM.
Michael T
Happy Carving!
╔═══ Links to Patterns & Resources for CompuCarve & CarveWright ═══╗
 Junior Member
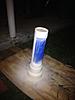
Michael, I know I said I would upload my photos shortly there after - I took a short hiatus. Here's the finished photo of the rotary litho you helped me complete. I ended up using the Lowe's end cap modified to hold the puck light in the base, couldn't find the touch sensitivity lights so opted for the regular plug ins. I used the simple $.70 cap from lowe's for the top super glued on - unfortunately didn't take any finished photos but the idea is there. I didn't like how much light passed through the top or the fact that it still looked and felt like pvc so I roughed it up and used some Alabaster stone finish paint to give it a textured look. If I can get some finished photos I'll upload them, paint took a while to dry but was well worth the effect. I just wanted to say thank you again for the input - I have a few other ideas in store floating around to do with the rotary lithos, if/when I get them done I'll be sure to let you know when I post them.
Paul
-Paul
"The secret to getting ahead is getting started." -Mark Twain
 Junior Member
Paul, that looks awesome! To clarify, it looks like you masked off the litho, but not the text, when you painted. Is the text still as bright/visible? Does the litho section still look like carved PVC?
- KenLater model "B" Machine with CarveTight and Rubber belt upgrades
RNB Model "A" Dust Collection, Scanning Probe, Rotary Jig
Designer 3, Conforming Vectors, STL Importer, DXF Importer, Rotary, Basic, Pattern Editor (Probe), Advanced 3D, Centerline
Senior Member
Paul,
Thank you for showing us the photos! The litho looks fantastic. Great idea to use that Alabaster stone finish paint.
I'm looking forward to seeing your other ideas, too!
Thanks again.
Michael T
Happy Carving!
╔═══ Links to Patterns & Resources for CompuCarve & CarveWright ═══╗
Junior Member
That's correct I didn't tape off the letters when I painted the litho. I made a point of not hitting that area too hard but the finish closely resembled the rough finish left after carving the litho area, the letters still showed through fine when I finished. The textured finish idea came after the carving, I'm thinking of sanding and painting the pvc prior to carving next time around to see if it works out better - a little weary on effect on the bit, we'll see though. Thanks for the input and once I get a photo from the recipients I'll edit the post and add it in.
-Paul
"The secret to getting ahead is getting started." -Mark Twain
Junior Member
Im using the ring neck with a harbor freight dust remover. It works good. Here is my first rotary lithophane. I've been doing lithophanes for the last four years. Settings are .17, with a rise of 200.
 Senior Member
That turned out exceptionally well.
How are you mounting it and/or adding light. Here in Oregon I can't come up all the parts suggested by Michael. I just might have to carve a base and top.
 2016 Conference Sponsor
Tatay44
Well done.
Happy Carving
Robert D.
rcdages
CarveWright START U Team Member.
The mightiest oak in the forest is just a little nut
that held it's ground.
 Member
I really like the painting idea.
dave
 Posting Permissions

 Reply With Quote