
Anyone have any decent projects where they have carved a photo into wood? Any tips for doing so?
I know they look so much better in Plastic, but I have a potential customer wanting to see it carved in wood and I just don't have any.


 CarveWright Staff
Anyone have any decent projects where they have carved a photo into wood? Any tips for doing so?
I know they look so much better in Plastic, but I have a potential customer wanting to see it carved in wood and I just don't have any.
CarveWright CX Packaged System - starting at $2000
CarversClub 1 Year Subscription - $150.00/year
Adv. Support w/out CC membership - $25.00/issue
CarveWright Community Forum - PRICELESS!
Banned
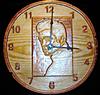
I am lacking as a photographer but here is a clock done from a photo of Elvis Presley. No tips from me though I got the pattern from someone else. I am sure some senior members can chime in. It actually took three attempts for me to get this right. The first the image was inverted and did not come out looking good, the next was better but required more depth. This finished clock was my third attempt and I thought it came out good. I used a stain pen to stain the pine and them sprayed the clock with a Lacquer finish.
Last edited by gregsolano; 04-20-2011 at 12:05 PM.
 Senior Member
Just to be clear, you cannot simply import a photo and get results like Elvis. You stated that you "got the pattern from someone else" - that is key. It was a pattern, not a photo. When you import a photo, the lighter areas are carved deeper and the darker areas less (or vice versa). If you carve in a translucent plastic and shine a light through, you get a photo-like result, because the deeper- carved areas transmit more light and the taller areas less, just like the photo. To carve a good-looking image in wood from a photo, the image must be manipulated by someone skilled with other software to make a more realistic 3D (or 2.5D) carving.
CarveWright Staff
You are exactly right, but has anyone imported a photo and carved in wood with good (decent) results without taking into third party software and manipulating?Originally Posted by DickB

CarveWright CX Packaged System - starting at $2000
CarversClub 1 Year Subscription - $150.00/year
Adv. Support w/out CC membership - $25.00/issue
CarveWright Community Forum - PRICELESS!
 Senior Member
You know, carvings of photos in wood aren't that great - they turn out a tad grainy (pun intended).
Livin' Life
Lovin' My Carvewright
 Junior Member
Just a thought... try carving at a VERY shallow depth (say, 1/16th inch) and then wipe (not brush) some stain over it. The deeper part would hold more stain and the higher parts would get wiped away. I haven't tried it but it might simulate the shades of grey in the image and give a more realistic result.
Frederick Potter
Editions by Frederick
http://www.editionsbyfrederick.com
Keep 98% of the dust out of your machine with this free dust collector:
http://forum.carvewright.com/showthr...e-final-answer
 Senior Member
That should be easy, first crank up the band saw mill and cut a few Slabs and when you find one you like take a photo of it and make a Wood 1 image for the CW unit. Then make a PTN of a photo you want to carve, this one is my Great-Great grand child named Haley Harp. Set up the MPC to make the carving. Then mount the Slab on a Carrier Board so the widest part of the slab is on the edge next to the Key Pad, ( this is the first place the CW unit starts the board measurement (the Width)) Next the CW unit checks the length, when the rollers Uncompress, that will be the length. If the slab is 7 inches longer than your MPC it will center on the slab, if the slab is short then you will need rails.
Hope this helps. BJB
Last edited by bjbethke; 04-20-2011 at 06:33 PM.
Using Designer Version 1.187
Donations are always welcomed, thanks send a check to my PO Box 652
BJB
PO Box 652
Yellville,AR 72687-0652
PM me for my e-mail address.
CarveWright Staff
LOL! I think you just answered two posts in one...that's two! two! two! posts in one!
(Sorry, think I just had a flashback to an old Raisin Brand commercial.)
CarveWright CX Packaged System - starting at $2000
CarversClub 1 Year Subscription - $150.00/year
Adv. Support w/out CC membership - $25.00/issue
CarveWright Community Forum - PRICELESS!
Junior Member
actualy I beleive your thinking of a "Certs" two mints in one commercial. (not that it matters,lol)
Member
That Elvis pattern looks like it was some kind of black and white clip art. Its easy to carve that kind of thing. Sometimes photos can be turned into black and white images fairly simply but most would not. Being skilled in photoshop I could turn just about anything into black and white by selecting portions of a photo seperately and using the levels to make darks darker and lights lighter. Once you have a black and a white image all you have to do is set the depth with designer. Someone skilled could also create different shades in areas to make things pop up at different levels. Also blurring edges gives a round gradual edge.
Alan
 Posting Permissions

 Reply With Quote